Monday, 27 February 2017
Installation of MQ in Windows and Linux

Contents
Purpose
of this document:
This document
describes the Installation process of MQ
version 7.5 for Linux and Windows
Environment.
Websphere MQ 7.5 Installation
Introduction
Web Sphere MQ has many components which are available as
part of the core or as Support Pacs or add-ons. They are available for a wide
variety of platforms we will focus on Linux and Windows.
Create user and group mqm
§ Create a group
called mqm
§ Create a user
called mqm
groupadd –g
<gid> mqm
useradd -u
<uid> -d /var/mqm -g mqm mqm
|
In the above commands we have created a group call mqm with
a gid as specified. Then we are creating a user with uid as specified and root
folder /var/mqm and tagged to the group mqm.
§ Type the below command to verify if the user has been
added properly
|
Any other user who needs MQ admin privilege needs to be a
part of mqm group.
§ Note:You use the user mod command to add user to an
existing mqm group
usermod -G mqm
<userId>
|
OS Consideration
The values given below are the recommended values for a single
queue manager. If you are running more than one queue manager then increase
fs.file-max to a bigger value. The kernel settings can be changed by changing
/etc/sysctl.conf file.
$ vi
/etc/sysctl.conf
kernel.msgmni = 1024
kernel.shmmni = 4096
kernel.shmall =
2097152
kernel.shmmax =
268435456
kernel.sem = 500
256000 250 1024
fs.file-max = 524288
net.ipv4.tcp_keepalive_time
= 300
|
§ If you change /etc/sysctl.conf file, execute the
command given below to bring changes to effect immediately
sysctl -p
|
PAM module sets limits on the system resources that can be
obtained in a user-session. By default, limits are taken from the
/etc/security/limits.conf config file.
vi
/etc/security/limits.conf
mqm hard nproc 10240
mqm soft nproc 10240
|
Web Sphere MQ Installation on Linux
Official full versions are available form the IBM Passport
Advantage site if you have a valid account/subscription.
§ Unzip and untar the downloaded WMQ 7.5 installable
files to a temp location
gunzip WS_MQ_FOR_LNX_ON_X86_64_V7.5_EIMG.tar.gz
tar -xvf WS_MQ_FOR_LNX_ON_X86_64_V7.5_EIMG.tar.gz
|
The tar contains the below files
MQSeriesRuntime-7.5.0-0.x86_64.rpm
MQSeriesSDK-7.5.0-0.x86_64.rpm
MQSeriesSamples-7.5.0-0.x86_64.rpm
MQSeriesClient-7.5.0-0.x86_64.rpm
MQSeriesJava-7.5.0-0.x86_64.rpm
MQSeriesJRE-7.5.0-0.x86_64.rpm
MQSeriesGSKit-7.5.0-0.x86_64.rpm
MQSeriesMan-7.5.0-0.x86_64.rpm
MQSeriesMsg_fr-7.5.0-0.x86_64.rpm
MQSeriesMsg_es-7.5.0-0.x86_64.rpm
MQSeriesMsg_de-7.5.0-0.x86_64.rpm
MQSeriesMsg_ru-7.5.0-0.x86_64.rpm
MQSeriesMsg_pt-7.5.0-0.x86_64.rpm
MQSeriesMsg_ko-7.5.0-0.x86_64.rpm
MQSeriesMsg_ja-7.5.0-0.x86_64.rpm
MQSeriesMsg_it-7.5.0-0.x86_64.rpm
MQSeriesMsg_Zh_CN-7.5.0-0.x86_64.rpm
MQSeriesMsg_pl-7.5.0-0.x86_64.rpm
MQSeriesMsg_hu-7.5.0-0.x86_64.rpm
MQSeriesMsg_cs-7.5.0-0.x86_64.rpm
MQSeriesMsg_Zh_TW-7.5.0-0.x86_64.rpm
MQSeriesXRClients-7.5.0-0.x86_64.rpm
MQSeriesServer-7.5.0-0.x86_64.rpm
MQSeriesFTBase-7.5.0-0.x86_64.rpm
MQSeriesFTTools-7.5.0-0.x86_64.rpm
MQSeriesFTService-7.5.0-0.x86_64.rpm
MQSeriesFTAgent-7.5.0-0.x86_64.rpm
MQSeriesFTLogger-7.5.0-0.x86_64.rpm
MQSeriesAMS-7.5.0-0.x86_64.rpm
MQSeriesExplorer-7.5.0-0.x86_64.rpm
MQSeriesXRService-7.5.0-0.x86_64.rpm
repackage
READMEs
PreReqs
mqlicense.sh
licenses
lap
crtmqpkg
copyright
|
§ Execute the command given below. Hit 1 to accept the
license agreement.
./mqlicense.sh
-text_only
|
§ Install the minimum components needed for a server by
executing rpm command as shown below
rpm -ivh
MQSeriesRuntime-*.rpm MQSeriesServer-*.rpm
|
Result:
|
[root@localhost
wmq75_install]# rpm -ivh MQSeriesRuntime-*.rpm MQSeriesServer-*.rpm
Preparing...
########################################### [100%]
1:MQSeriesRuntime
########################################### [ 50%]
2:MQSeriesServer
########################################### [100%]
|
To install the samples
run the following command:
|
rpm -ivh
MQSeriesSamples-7.5.0-0.x86_64.rpm
|
Result:
|
[root@localhost
wmq75_install]# rpm -ivh MQSeriesSamples-7.5.0-0.x86_64.rpm
Preparing...
########################################### [100%]
1:MQSeriesSamples
########################################### [100%]
|
The default directories for the installation are
/var/mqm
(Installation path)
/opt/mqm (Data path)
|
§ Set the Envrionment variables using setmqenv (you can
use crtmqenv to manually specify variables)
.
/opt/mqm/bin/setmqenv -s
|
Verify installation
§ Switch to mqm user by typing “su - mqm”
§ To confirm mq version installed, type dspmqver
$ dspmqver
Name: WebSphere MQ
Version: 7.5.0.0
Level: p000-L120605
BuildType: IKAP -
(Production)
Platform: WebSphere
MQ for Linux (x86-64 platform)
Mode: 64-bit
O/S: Linux
2.6.32-220.el6.x86_64
InstName:
Installation1
InstDesc:
InstPath: /opt/mqm
DataPath: /var/mqm
Primary: No
MaxCmdLevel: 750
|
§ Create and start Queue manager
$ crtmqm TEST1
There are 73 days
left in the trial period for this copy of WebSphere MQ.
WebSphere MQ queue
manager created.
Directory
'/var/mqm/qmgrs/TEST1' created.
The queue manager is
associated with installation 'Installation1'.
Creating or
replacing default objects for queue manager 'TEST1'.
Default objects
statistics : 71 created. 0 replaced. 0 failed.
Completing setup.
Setup completed.
$ strmqm TEST1
There are 73 days
left in the trial period for this copy of WebSphere MQ.
WebSphere MQ queue
manager 'TEST1' starting.
The queue manager is
associated with installation 'Installation1'.
5 log records
accessed on queue manager 'TEST1' during the log replay phase.
Log replay for queue
manager 'TEST1' complete.
Transaction manager
state recovered for queue manager 'TEST1'.
WebSphere MQ queue
manager 'TEST1' started using V7.5.0.0.
|
§ Define a local queue using MQSC commands
runmqsc TEST1
Enter the following
command:
DEFINE QLOCAL
(TEST.QUEUE)
<enter>
Result:
1 : DEFINE QLOCAL
(TEST.QUEUE)
AMQ8006: WebSphere
MQ queue created.
now type:
END
<enter>
One MQSC command
read.
No commands have a
syntax error.
All valid MQSC
commands were processed
|
Now that we have created a Queue manager and a queue local
we can put and get messages out of the queue using the sample program
(MQSeriesSamples installed above).
§ Execute the sample program amqsput to put a message
§ Execute the sample program amqsget to get a message
from the queue
Note that when the message is retrieved, it is also removed
from the queue.
cd $MQ_INSTALLATION_PATH/samp/bin
$ ./amqsput TEST.QUEUE
TEST1
Sample AMQSPUT0
start
target queue is TEST.QUEUE
Hi, this is a test
message
^C
$ ./amqsget TEST.QUEUE
TEST1
Sample AMQSGET0
start
message <Hi, this
is a test message>
no more messages
Sample AMQSGET0 end
|
Web sphere MQ Installtion on Windows.
§ Go to the Path Where MQ Binaries are located
§ Click on MQlaunch.exe


§ Select the path where you wish to install

§ Follow this for all the X

§ After the above step click on next and in next screen
click on Install later you will get the below screen.

§ Before you click Next follow below steps
§ Go to Computer –> Manage -> Local users and Groups
§ Under groups we need to add the service
id(ex:wmqsvcsd) in Administrators for completion of the installation.
§ Once the installation is done log off from the server and login through ID (wmqsvcsd) which we added.
§ Create the
Queue Manager as shown below.


§ Click on finish then a queue manager will be created
and we can start creating the queues and channels.
Verify installation
Verification process for MQ in windows is same as Linux
Creation and configuration of .Binding file in MQ
Administering JMS resources in IBM MQ
Introduction
JMS
administration for the IBM MQ administrator requires the JMSAdmin utility or IBM MQ Explorer and
an understanding of the JNDI namespace. In this exercise, you create a file
system-based JNDI namespace, define a queue connection factory, and define
destination objects. You then run the IBM MQ JmsJndiProducer sample program to place a JMS
message onto a destination and then retrieve that message by using the JmsJndiConsumer sample program. The JmsJndiProducer sample program generates a
random “lucky-number” and places a message on the specified destination. It
also displays JMS RFH2 data.
The
JmsJndiConsumer
sample
program gets a JMS message off the specified QCF/Destination and displays the
RFH2 data and the “lucky-number” that the JmsJndiProducer sample program generates.
The JMS sample programs are in the C:\Program
Files\WebSphere MQ\Tools\jms\samples directory.
CLASSPATH=mqinst\java\lib\com.ibm.mqjms.jar;mqinst\tools\jms\samples
Where mqinst is the IBM MQ installation directory.
•Windows
PATH contains path to Java runtime file: C:\Program Files\IBM\WebSphere
MQ\java\jre\bin

STEP 1:-
In Step 1 we are going to create
1)A file system based JNDI Property
2)Queue Connection Factory
3)One Destination defination for the local queue.
STEP 2:-
Start QM1 Queue manager

Step 3:-
create a Local Queue by name QL.A

Step 4:-
Create a directory for your
JNDI FSContext namespace repository.
Using Windows Explorer,
create a folder that is named C:\JMSContext.

Step 5:-
Use IBM MQ Explorer to configure
the JMS administered object for the JNDI namespace.
In the dialog box that is
displayed, select File System and choose the C:\JMSContext directory
for the Bindings directory. __ a.
Right-click JMS Administered Objects and click Add Initial Context.


Click Next. Ensure that the Connect
immediately on finish check box is selected.

Step 6:-
Click Finish. The new
initial context appears under the JMS Administered Objects folder in the
IBM MQ Explorer Navigator.
Use IBM MQ Explorer to
define a queue connection factory.
a. Expand the initial context object that you created in Step 4 under
the JMS
Administered Objects folder in
the IBM MQ Explorer Navigator.
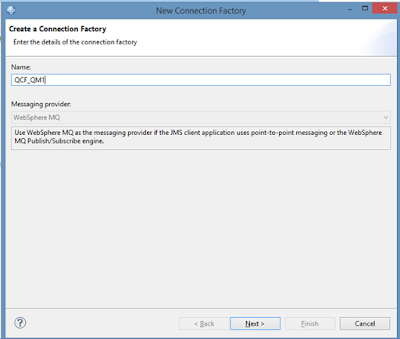
b. Right-click Connection Factories and click New > Connection
Factory.

c. Name the new connection factory QCF_QM1 and then click Next.


d. For the Type, select Queue Connection Factory. Click Next.

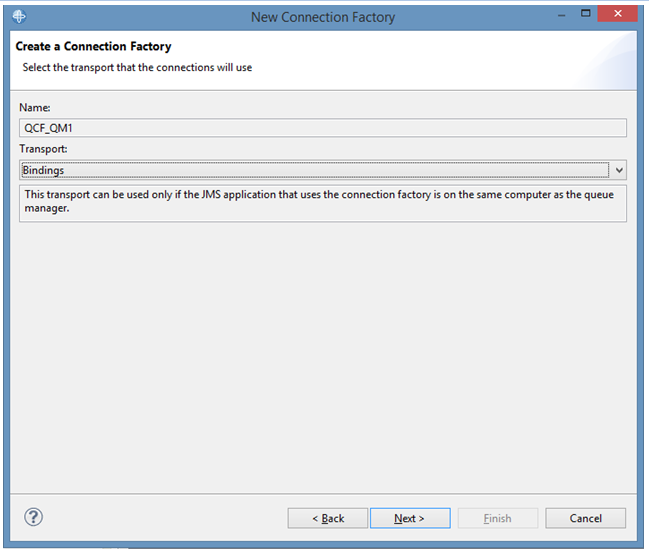
e. Verify that the Transport is set to Bindings. Click Next.
f. Click Next to proceed to the Change properties window.

g. Click Connection to display the connection properties.
h. For the Base Queue Manager, select QM1.

I. Click Finish. The new
connection factory, QCF_QM1 should appear in the Connection Factories
Content view

STEP 7:-
Use IBM MQ Explorer to define a destination
administered object for QL.A.
a. Under the initial context folder in the IBM MQ Explorer Navigator,
right-click
Destinations and click New
> Destination.

b. Name the new destination DEST_QL.A

c. Set the type as Queue and then click Next.
d. Click Next again.
e. In the Change properties window, select QL.A for Queue.

f. Click Finish. The
destination DEST_QL.A should appear in the Destinations content view.

STEP 8:-
Run the JmsJndiConsumer sample.
You must run the JMS samples in a command
prompt. The samples are in the C:\Program Files\IBM\WebSphere
MQ\tools\jms\samples directory.
a. Java is in C:\Program Files\IBM\WebSphere MQ\Java\jre\bin\. This
folder should already be in the path.
Make sure that Java is found before
proceeding.
Type: java
b. Run the batch file cp.bat in the C:\labfiles\Lab09 directory to set
the Windows class path.
c. Run the JmsJndiProducer sample program. The syntax is:
java JmsJndiProducer -i
file:PathName -c <QcfName> -d <Destination>
Type:
java JmsJndiProducer -i
file:/C:/JMSContext -c QCF_QM1 -d DEST_QL.A
Your results should appear
similar to the following example:

d. Note the lucky number that the JmsJndiProducer generated
for you.
Using IBM MQ
Explorer, verify that a message was put on the queue QL.A on QM1.
STEP 9:-
Browse the message and view the message data.

STEP 10:-
Verify that the message was taken off the queue QL.A on QM1.
Subscribe to:
Comments (Atom)